앱 개발을 해보자 - ① 개발환경 셋팅 (android studio 설치)
2019. 9. 22. 16:26ㆍ안드로이드 개발
안드로이드 앱개발 개발환경 셋팅!
1. Android Studio 설치
Download Android Studio and SDK tools | Android Developers
developer.android.com
- 본인 OS 에 맞는 Android Studio 를 다운로드 받아줍시다. (필자는 Windows 10 - 64 bit 기준으로 진행합니다.
- 설치를 완료해줍시다.
2. 내 프로젝트 만들기

- Start a new Android Studio Project 로 프로젝트를 생성해줍니다.
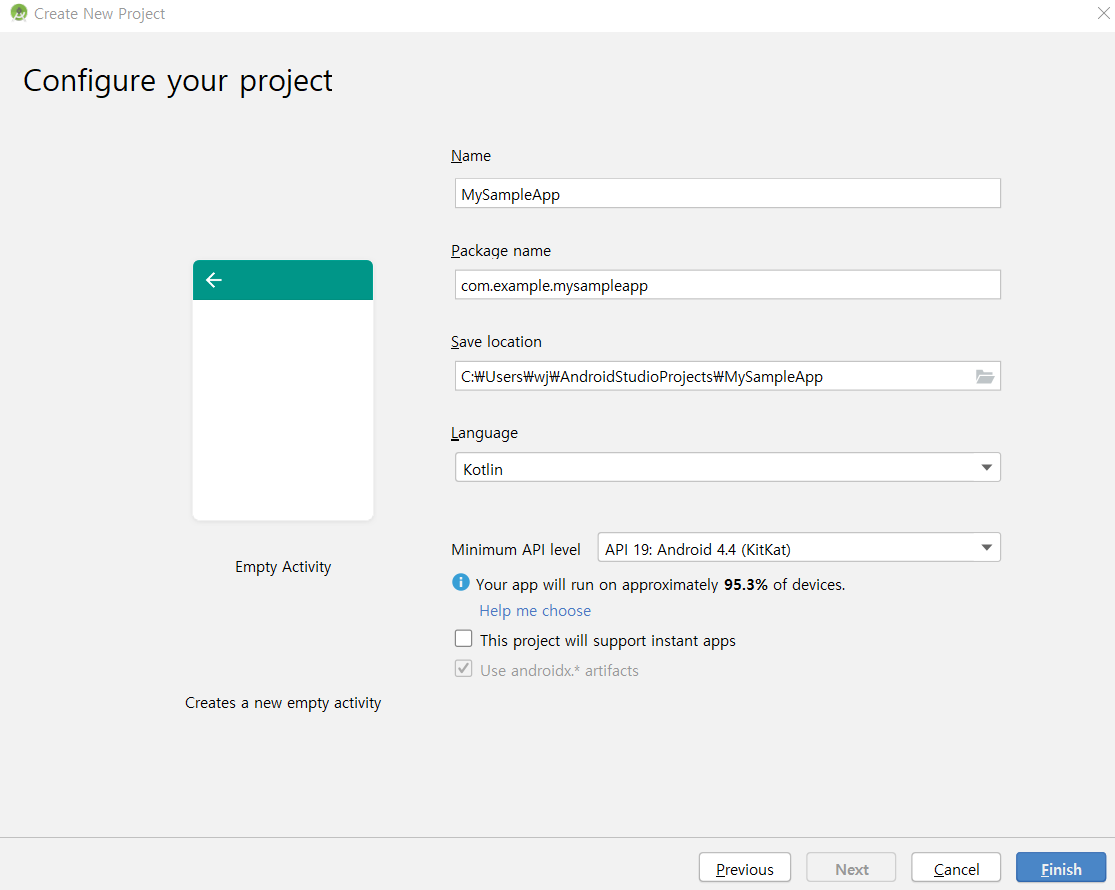
- Empty Activity 클릭
- Name, package name 등 필요한 정보를 입력해 줍시다. (언어는 Kotlin 기준으로 진행합니다, )
- 프로젝트 구조를 살펴봅시다.

1) app > java > com.example.myfirstapp > MainActivity
앱이 시작하게 되면 처음으로 보게 될 Activity입니다.
package com.example.mysampleapp

import androidx.appcompat.app.AppCompatActivity
import android.os.Bundle

class MainActivity : AppCompatActivity() {

    override fun onCreate(savedInstanceState: Bundle?) {
        super.onCreate(savedInstanceState)
        setContentView(R.layout.activity_main)
    }
}
2) app > res > layout > activity_main.xml
Activity UI 레이아웃을 정의합니다.
android:text="Hello world" 등 UI의 텍스트를 지정하는 것이 보이는군요!
<?xml version="1.0" encoding="utf-8"?>
<androidx.constraintlayout.widget.ConstraintLayout xmlns:android="http://schemas.android.com/apk/res/android"
    xmlns:app="http://schemas.android.com/apk/res-auto"
    xmlns:tools="http://schemas.android.com/tools"
    android:layout_width="match_parent"
    android:layout_height="match_parent"
    tools:context=".MainActivity">

    <TextView
        android:layout_width="wrap_content"
        android:layout_height="wrap_content"
        android:text="Hello World!"
        app:layout_constraintBottom_toBottomOf="parent"
        app:layout_constraintLeft_toLeftOf="parent"
        app:layout_constraintRight_toRightOf="parent"
        app:layout_constraintTop_toTopOf="parent" />

</androidx.constraintlayout.widget.ConstraintLayout>
3) app > manifests > AndroidManifest.xml
앱의 기본 특성을 설명하고 앱의 각 구성요소를 정의합니다.
기본적으로 앱의 아이콘(android:icon) 등을 정의하는군요.
<?xml version="1.0" encoding="utf-8"?>
<manifest xmlns:android="http://schemas.android.com/apk/res/android"
    package="com.example.mysampleapp">

    <application
        android:allowBackup="true"
        android:icon="@mipmap/ic_launcher"
        android:label="@string/app_name"
        android:roundIcon="@mipmap/ic_launcher_round"
        android:supportsRtl="true"
        android:theme="@style/AppTheme">
        <activity android:name=".MainActivity">
            <intent-filter>
                <action android:name="android.intent.action.MAIN" />

                <category android:name="android.intent.category.LAUNCHER" />
            </intent-filter>
        </activity>
    </application>

</manifest>
4) Gradle Scripts > build.gradle
똑같은 파일의 이름이 2개가 있군요.
하나는 프로젝트 용이고 하나는 앱 모듈 용입니다.
주로 앱을 빌드하기 위한 Depenency 정보 등이 기록되어있습니다.
compileSdkVersion, minSdkVersion 등이 보이는군요!
아래 해당 앱을 빌드하기 위한 dependencies 들도 기록되 있는것을 볼 수 있습니다.
apply plugin: 'com.android.application'

apply plugin: 'kotlin-android'

apply plugin: 'kotlin-android-extensions'

android {
    compileSdkVersion 29
    buildToolsVersion "29.0.2"
    defaultConfig {
        applicationId "com.example.mysampleapp"
        minSdkVersion 19
        targetSdkVersion 29
        versionCode 1
        versionName "1.0"
        testInstrumentationRunner "androidx.test.runner.AndroidJUnitRunner"
    }
    buildTypes {
        release {
            minifyEnabled false
            proguardFiles getDefaultProguardFile('proguard-android-optimize.txt'), 'proguard-rules.pro'
        }
    }
}

dependencies {
    implementation fileTree(dir: 'libs', include: ['*.jar'])
    implementation"org.jetbrains.kotlin:kotlin-stdlib-jdk7:$kotlin_version"
    implementation 'androidx.appcompat:appcompat:1.0.2'
    implementation 'androidx.core:core-ktx:1.0.2'
    implementation 'androidx.constraintlayout:constraintlayout:1.1.3'
    testImplementation 'junit:junit:4.12'
    androidTestImplementation 'androidx.test:runner:1.1.1'
    androidTestImplementation 'androidx.test.espresso:espresso-core:3.1.1'
}
'안드로이드 개발' 카테고리의 다른 글
| 앱 개발을 해보자 - ③ 버튼을 만들어보자 (0) | 2019.09.24 |
|---|---|
| 앱 개발을 해보자 - ② 가상머신(AVD)을 이용한 실행을 해보자 (0) | 2019.09.24 |